Light Painting with a BMW
Light painting is fun.
If you’ve never tried it before, go try it. You won’t regret it. All you need is a tripod, a camera that can take slow shutter pictures and a strong, mobile light source. Even a flashlight works
For this shot I used the LedGo CN-B150 portable video light.
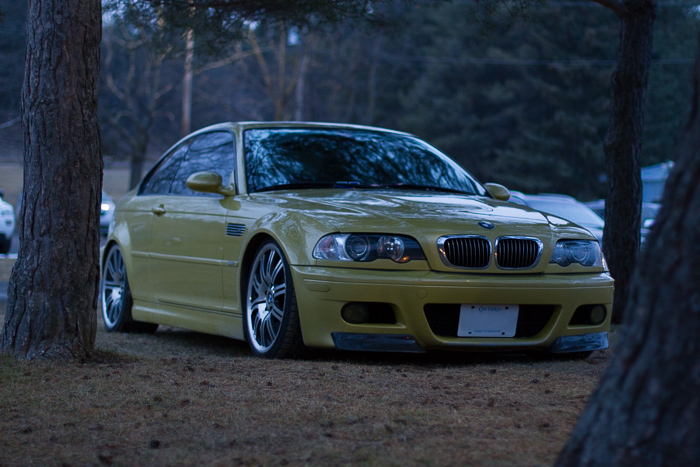
Here’s the shot at ambient light conditions, you can see the kind of light I’m working with:
Settings:
ISO 1000, f1.8, 1/20
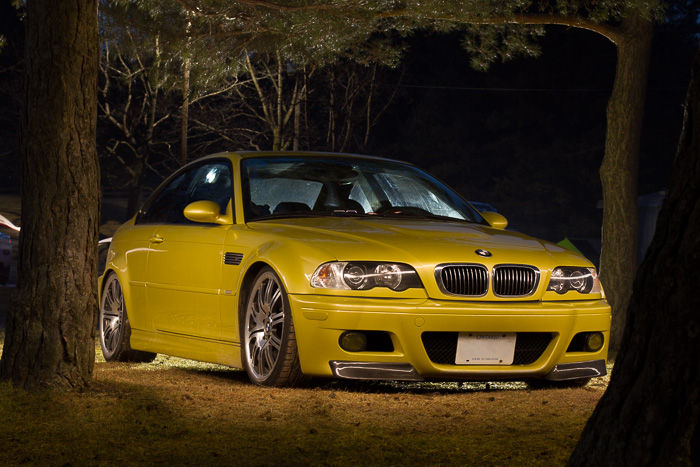
The Shot
The goal was to show a bit of the background, to lend some context to the picture, but to make sure that the car really stood out.
First things first: Bring ISO down to 100 to get the best quality of picture and to darken the image.
Next I had to figure out how much time was needed to “paint” all the way around the car. After some spectacular failures at shorter shutter speeds, I settled on 15 seconds.
With ISO and shutter speed set, an aperture of f8.0 that gave me a good, dark exposure.
Last but not least, we parked a truck directly behind the car so that the truck’s headlights gave us a rimlight. I’m not sure if I would do this again, since it also lit up some smudges on the windows which I had to fix up in post processing.
One fun part about light painting is that you can make your light source stronger or weaker with your in-camera settings. A higher ISO or wider aperture will effectively boost the strength of your light.
When I paint the car with light I’m using my body and coat to shield the light from the camera, otherwise there would be streaks of light in the air all around the car.
Settings:
ISO 100
f8.0
15”
The Edit
The final shot didn’t require much for exposure tweaks. After a simple crop to help with the composition, the car got a boost in clarity, sharpening, saturation and vibrance to help it pop.
I also used a gentle vignette and some graduated filters to darken the edges of the image and hide some distractions.
To really bring out the yellow colour, I pulled back the competiting colours in the image wiht Lightroom’s colour-specific saturation sliders. I killed all the green and strongly reduced the blue, which really simplified the image.
This picture got some fairly aggressive spot removal treatment. There are a bunch of little distractions, like details on windows of the car, in the background of the image and the license plate. Fortunately these can be dealt with easily enough in Photoshop.
And here’s the final image:

The latest posts from the Photography Blog

Preparing for Your Family Photography Shoot: 6 Important Things to Consider
Preparing for Your Family Photography Shoot: 6 Important Things to ConsiderPlanning a family photoshoot? This short guide will give a list of what to consider in advance to make sure to get the most out of the time and have confidence you'll get some great...
How to Take Photos from the Grandstands of the Canadian Formula One Grand Prix in Montreal
How to Take Photos from the Grandstands of the Canadian Formula One Grand Prix in Montreal While all sports are challenging to photograph in their own way, Formula One is an especially difficult event to capture for the casual photographer. This guide is a summary of...

The Top 5 Reasons to Book a Corporate Headshot Photoshoot for Yourself or Your Team
The Top 5 Reasons to Book a Corporate Headshot Photoshoot for Yourself or Your TeamA professional, current headshot is a must in today’s digital-first society. For many lines of work, the difference between a good or a not-so-good headshot might be the dealbreaker in...

How to Photograph a Poker Game
How to Photograph a Poker GamePhotography is a varied skill, with each subject presenting a different challenge for you and your camera.Whether photographing sports, people in the street or wildlife, you will need to draw on different skills, both in terms of...
Creating Your Own Luck on the Street
Creating Your Own Luck on the StreetStreet photography is both exhilarating and nerve-inducing in equal measure. Capturing real people, as unpredictable and varied as they are, can offer huge challenges and wonderful rewards. As demonstrated in our article...
What are the best camera settings for hockey photography?
Have you ever tried to shoot hockey with your camera set to “Auto” or “Sport” and been disappointed with the results?
Cameras are getting smarter every day — but they still struggle with the challenges that come with photographing hockey.
The good news is that you can learn to set up your camera in manual mode and make the most of your time at rink.